Don’t just put a plastic bag under the pillow, instead create this cute DIY felt tooth fairy pillow!

I created these little tooth fairy pillows when my son first got a wiggly tooth. I wanted to have something to put his tooth in so it wasn’t just floating beneath his pillow.
The pillows have held up so well over the past few years and the kids love them. They were fairly easy to make an inexpensive.

Want more ideas like this? Subscribe today and get access to our VIP library with tons of free printables and our monthly newsletter full of DIY ideas.
How To Make Felt Tooth Fairy Pillow
Create this little felt tooth fairy pillow so your kids will have somewhere to put their lost teeth.
What You Need:
DISCLOSURE: This post may contain affiliate links. If you purchase items through my links I may earn a commission. You can find our full policy here. Thank you.
Tools Needed:
- Ruler
- Fabric Scissors
- Embroidery Needle
Supplies Needed:
- Felt – white, whatever color for the main pillow
- Embroidery Thread – white, red, and coordinating color to felt backing

Tips for Felt
Trace the Heart and Tooth
I am not great at free handing any shapes. So I always print out a template and trace it onto my project. If you feel comfortable drawing it yourself, go for it! Otherwise, use a template.

Stitches Used
There are three types of stitches used in this project and I promise they are so easy to do. If you don’t feel comfortable stitching, you could always glue the pieces together and use a red felt heart instead of the red stitching.
Back Stitch
This is the stitch used to create the heart on the tooth and the name under the tooth.
First, trace your heart and your name on to the project. This will give you an outline to follow.
Start by threading the needle up through your fabric, and do one stitch forward. Then from the backside, decide the length you want your stitch to be and put the need through your fabric. Bring the needle back through the end of the previous stitch.

This stitch will create a solid line. On the curves of the heart, do smaller stitches in order to follow the curve.
Whip Stitch
Use the whip stitch to attach the tooth to the front of the pillow. Stick the needle up through the backing and the tooth near the edge, then come down right next to the edge of the tooth and only put the needle through the backing felt.

When coming back up, insert the needle about 1/4 inch away from the previous stitch and continue all the way around the tooth. Leave the top part open so that the tooth is not completely attached to the pillow, otherwise there will be no where to put your child’s tooth.
Blanket Stitch
Use this stitch to attach the front and back of the pillow together. It’s very similar to the whip stitch. To hide your beginning knot, create the first stitch in between the two layers. Sandwich your layers together and poke the needle through the top and out the back.

Then run your needle through the loop you create before pulling through. Continue to create stitches 1/4 inch apart around the whole of the felt.

Felt Tooth Fairy Pillow
Cute felt tooth fairy pillow so kids have somewhere to put their lost teeth.
Materials
- Felt in White
- Felt in Any Color
- Embroidery Thread in White
- Embroidery Thread in Red
- Embroidery Thread in Any Color
- Stuffing
Tools
- Fabric Scissors
- Embroidery Needle
Instructions
- Cutout two felt pieces in any color into a 4 inch by 4 inch square. Cut two pieces of felt in white into the shape of a tooth.
- On one felt tooth, stitch a red heart using a back stitch.
- Put the two tooth shapes together and whip stitch the top of the two tooth shapes. Then arrange the shapes onto the felt 4x4 and use a whip stitch to attach the tooth shapes to the center of the felt.
- Use a back stitch to embroider your child's name underneath the tooth shape.
- Put the two 4x4 inch felt pieces together with the tooth on the top. Create a blanket stitch along the sides to attach the two pieces together. Fill with stuffing and then close up the pillow.
Love the ideas you see here on AmyLanham.com? Subscribe today and get access to our VIP library with tons of free printables and our monthly newsletter full of DIY ideas.

What’s Next?
If you like this tooth fairy pillow you might like these other kids crafts too.

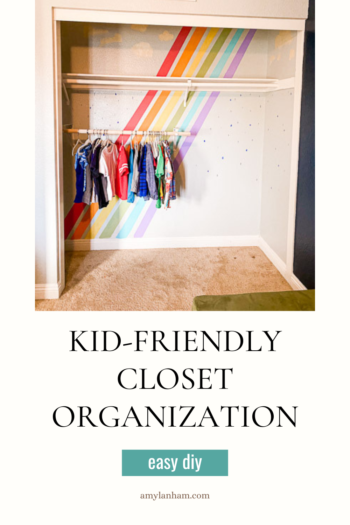
Kid Friendly Closet Organization