

I’ve been wanting to create some new wood shelves for my bathroom. After going to Home Depot and looking at all the stains, I couldn’t find on that I loved. I found a couple that I really liked, but they were expensive.
A quick Google search shows me I could make the stain myself. I figured it was worth a shot to make a ‘free’ stain rather than spend money on one I may not like.
I was going for a really old wood, barnyard, rustic feel. This stain is perfect for that and I love the way it turned out.
DIY Wood Stain
Supplies
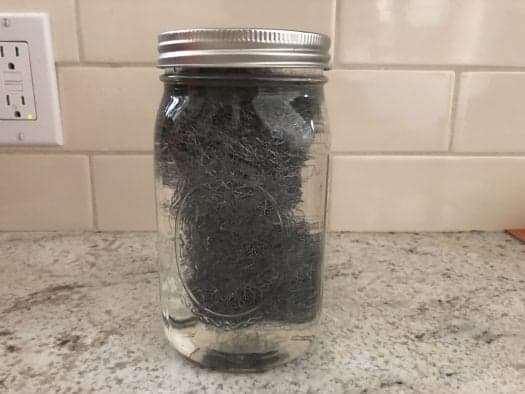
- Mason Jar
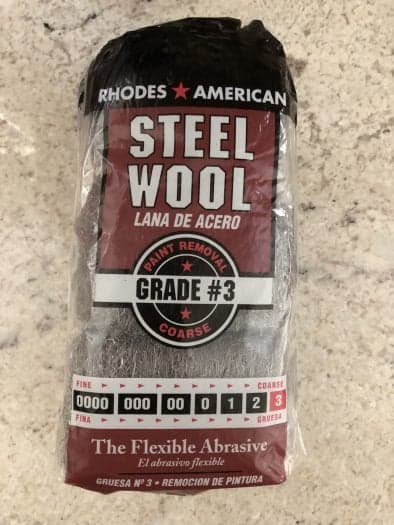
- Steel Wool – I used the coarsest 3
- Vinegar
Instructions
Know that whatever you put this in will probably get ruined. My mason jar had a rust ring around it that we could never get off.
Put the steel wool in the bottom of the mason jar after fluffing it out a bit. Then pour the vinegar over the steel wool. You can put the cap on half way, but it needs the air to oxidize.
The Experiment
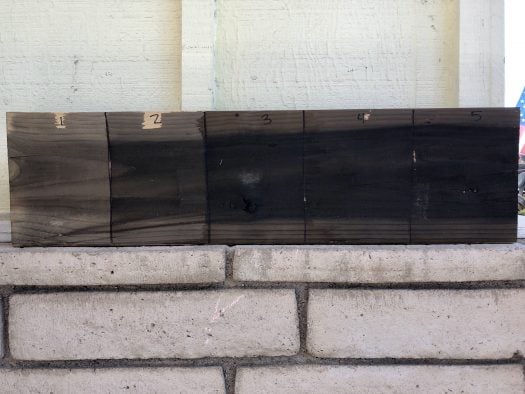
I decided since I had some extra time and a scrap piece of wood to do an experiment. The goal was to see what the coloring would look like each day for 5 days.
I started on Sunday, creating my steel wool and vinegar stain. Then I would apply the stain to the same piece of wood on Monday, Tuesday, Wednesday, Thursday, and Friday.
My goal was to see how long you actually had to let the stain sit. I used the coarsest steel wool: 3, because that what we had purchased.
Personally, I like the coarse wool because you can get many different stains and I don’t mind waiting a few days. But if you need faster results, buy a finer wool.
The Results
On day one, I thought for use the stain wouldn’t work. It didn’t look like anything had happen with my mixture. As I applied it, it just looked like wetting wood. But it did change the color of the wood.
After this experiment, I think letting it sit for 3-5 days is best. You can definitely let it sit less and get results. I think the one day coloring looks good too, and want to stain something with it.
Sealing the Wood
This is an optional step. You could leave the wood as is. I found that the stain sort of rubs off though. It doesn’t make the wood any lighter, but it does get your hands dirty.
I’ve heard you could use polyurethane, but I didn’t have that on hand. I decided to try Annie Sloan Soft Wax in clear.
The wax gives the wood a nice finish. It also helps the stain stay it place and you’ll no longer get your hands dirty.
A few tips:
1.) Don’t accidentally buy stainless steel. I did this at first. Stainless steel doesn’t rust. If you do accidentally do this, change out the vinegar or it won’t work properly
2.) If you want faster results use the finest steel wool: 0000. If you don’t mind waiting a few days for a dark stain, you want a lighter stain, or you want more control over your stain, go with the coarser steel wool: 3. There’s also many options in between.
3.) The stain will be very light when you apply it. It will darken as it soaks into the wood, and then may lighten as it dries. I recommend a test piece of wood.
4.) You really can’t go by the color of the vinegar mixture. It’s going to stay relatively clear, maybe get cloudy, but it will still work.
5.) Steel Wool is not sold in cleaning sections. You’ll have to go to a home improvement store, or the paint section at WalMart.
Interesting. Any ways to create different colors?
You mean like blue or green? I’m not sure. I know apple cider vinegar produces a different color stain, I think it’s more grey. But I don’t know if you could do like rainbow colors. Something to experiment with!
I’ve never seen a wood staining process like this before. What a great idea! And using items that we probably already have at home. Thanks for sharing your experiment!
This is very creative. I’ve never heard of anyone making their own stain before. I haven’t had any problem finding stain I liked (I love warm natural woods) but do know others that found it challenging.
That’s very interesting – I had no idea you could do this. I have only finished something with polyurethane, not used a wood stain. This looks like an interesting technique.
Pingback: DIY Floating Shelves -
Pingback: DIY Towel Rack - Ikea Hack -
Pingback: DIY Pirate Chest -